  |
||
 |
 |
 |
 |
 |
||
| reference articles | competition journal | piping links | FAQ | contact me |
Andrew's Tips: Seasoning a Bagpipe BagBy Andrew T. Lenz, Jr., Santa Cruz, California, ©1999 - 2010
Instructions on how to season a bagpipe bag with Airtight:Most of these instructions will apply for other brands of seasoning. It is certainly recommended that you follow any instructions that are provided by your seasoning's manufacturer, though you may find that your bag requires less seasoning than suggested. Before you begin, remove any bag cover, the drones, chanter and blowpipe from the bag. If it's an older or previously overseasoned bag, shake any loose debris out of the bag into a trash can or over a spread-out newspaper. It would be a good idea to read the directions below completely before you start.
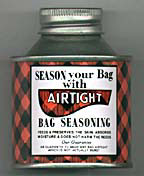
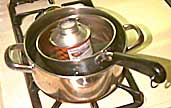
First, get your Airtight seasoning ready to use. Airtight comes in plastic containers. Since its inception up until the late 2000s, Airtight came in a metal container, which complicated the preparation process and lead to storage problems. If you happen to have an old can of Airtight, take off both lids off the can of Airtight. The inner one can be a little snug so people have developed a variety of methods for prying it off—a triangular can opener, screwdriver or ice pick with a hammer, needle-nose pliers, very sturdy but thin knife. (Though it's easy to break of the tip of a knife while prying, speaking from experience!) If you have a plastic container of Airtight, it's easy, just twist off the cap! There are three methods available to melt the seasoning: microwave, double-boiler, standing hot water. You only need to melt the seasoning to a syrup consistency. A completely runny consistency is unnecessary.
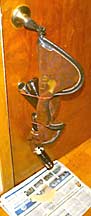
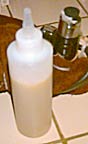
After you remove the seasoning from heat, you may wish to immediately pour it into a plastic squeeze bottle for easy dispensing. See discussion "Storing your Seasoning" below.
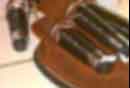
1) Having removed the drones, chanter and blowpipe from the bag, plug all the empty stocks with the exception of the blowpipe stock through which we'll pour the seasoning. 2) As added "insurance" for new seasoners I recommend putting wadded up paper towels into the drone stocks to keep the seasoning in the main body of the bag, unlike relying solely on rubber stoppers. To prevent the paper from slipping into the bag leave a small portion out and held in place with the stoppers. The chanter stock will get saturated so a paper towel there is pointless. An experienced seasoner can get by without anything in the stocks other than the rubber stoppers.
3) Pour about 4-5 tablespoons (2-3 for just "fungiciding" or "touch up") into the bag with the drone stocks pointed up then plug the blowpipe stock. If the bag is seriously in need to seasoning, you may wish to use a little more. When in doubt, use more than less. It won't hurt anything to use more, it just means more clean up of any excess. 4) Work the seasoning in the deflated bag for at least 15 minutes, especially the seams. Try and keep the drones upright. Put on the blowpipe and inflate the bag to full pressure. (Make sure your stoppers are tight. You don't want to catch one in the eye. It's happened.) This will force the seasoning into any stubborn spots in the bag that are not yet airtight, you can even lean on a fully inflated bag to increase pressure further. You may wish to keep blowing into the bag now and then over the course of 5-10 minutes to keep the pressure maximized. Remove the blowpipe and plug the stock back up with a rubber stopper. 5) Drain the bag, if necessary. (If nothing drains out, this isn't necessarily bad, and in fact may even be desirable in that you aren't wasting any seasoning.):
6) Remove the remaining plugs and clean out the stocks with paper towels, especially the blowpipe and chanter stocks. This is really important. Seasoning on your reeds is asking for trouble. Storing your SeasoningNumber 1 Rule: If you have one of the older metal cans, do not store seasoning in an opened can. If you leave unused seasoning in the can, it will definitely turn into green and black sludge even if it's refrigerated. The latest wisdom recommends storing the unused seasoning in a refrigerator where it will congeal. According to some, if left at room temperature the seasoning will remain liquid and can remain in good condition for "quite a while." However, there's been stories of "exploding" lids when opening a non-refrigerated container. I always put my seasoning into the refrigerator, as I believe most do these days. Putting the remainder into a plastic squeeze bottle is a good way to go, as it allows you to dispense the seasoning more easily, though it can be argued that you are required to unnecessarily reheat the entire quantity of seasoning with this method. Some suggest storing any unused portion into a sealed container, then later scooping seasoning out, placing into a small glass and heating using hot tap water (see "Method C" under the "get your Airtight ready to use" section above).
"How often do I need to season my bag?"Well, the pat but accurate answer is "when it needs it." Seasoning will help seal your bag, keep it supple, and aid in controlling bacteria and mold growth. When it should be done varies according to bag type and climate and use. Dry climate requires it more often, sheepskin requires it more often, and also more often for a dry blower. For some every three months is essential, others every 18 months is fine. A high-altitude location—such as Denver, Colorado, for instance—is going to require more frequent seasoning than the sea level of my "fog in the morning" coastal city. If your bag is losing air faster than it should or is growing undesireables within it, that's a good time to season. What's "faster than it should"? Well, everyone has their own opinion, but plug all your stocks but your blowstick, inflate your bag as tight as you can get it and then check it every few minutes. If it's still tight after 5-10 minutes (some say half-an-hour) you're in reasonably good shape. (Make sure your flapper valve is not leaking as it may be the culprit.) I once had a rather old bag that, when testing, I could completely deflate in under 30 seconds by pressing down on it—incredibly bad! I replaced the entire bag. "What's the seasoning made out of?"There's no official published Airtight contents list that I know of, but a few people have done some chemical testing and found that it's made of mostly lanolin suspended in glycerine and a small amount of lye. Not particularly toxic, but lye isn't that good for you if you are harboring any ideas about drinking it. "My container was already liquid when I got it, is that okay?"If your container is already liquid, it may be fine—or it may not. If after a day in the refrigerator your container is still liquid, it's gone bad and should be discarded.
A little history of Airtight.Airtight Bag Seasoning was invented by Robertson Bagpipe Makers of Edinburgh. (The traditional common seasoning was honey, which has natural anti-fungal properties but also attracts ants!) In the 1950s, Airtight was acquired by R.G. Hardie and gained much popularity. R.G. Hardie went into liquidation in October 2005—The Band Room which owned R.G. Hardie went bankrupt in August 2005. In December 2005, Piping Themes, a division of Gaelic Themes, purchased the equipment and ingredients, plus hired Hardie's seasoning makers to continue offering the product to the same standards. If you are considering a new bagpipe bag may be interested in visiting my page Bagpipe Bag Measurements and I also have a article on how to tie-in a bag. If you have any comments or suggestions, please contact me. This page last updated Sunday, March 14, 2010. |


| sitemap | ||

