|
Andrew's Tips: Bagpipes Bag Tie-In
By Andrew T. Lenz, Jr., Santa Cruz, California, ©2002-2015
This is a guide to tying in a hide bagpipe bag. As with any instructions, it is recommended that you read them completely before diving in. If you are given the opportunity to watch someone else doing this first hand, take advantage of it. Ask to tie-in one of the stocks while being supervised because, worst case, it will simply need to be tied over again.
A note on the photos below. Consider the images to be of multiple bag tie-ins. While in reality the photos were taken of a single bag tie-in, they are presented in a non-chronological, but logical order to accompany the text. Clear as mud? You'll see below.
Materials required
- New hide bag. (You may also be interested in my Bag Measurements page.)
- Two small strips of hide for the neck
- Tie-in cord (See "Tie-In Cord" box below.)
- Two 12" (30cm) pieces of sturdy wood, such as a cut broom handle
- Roll of dental floss or a little thread
- Sharp utility or hobby knife or razor blade
- Scissors
- Marking pen
|
Tie-In Cord
A "tie-in" kit available from a dealer ($3-$10) will typically contain tie-in cord—sometimes enough to do more than one bag, a couple leather pieces for the chanter stock, and perhaps a rudimentary instruction booklet.
For tie-in cord—especially if you plan to do a number of bags—it will be worthwhile to purchase a roll of artificial sinew (usually made of Dacron, a trademarked type of polyester fabric made by DuPont) which is a bit sticky and can often be found at craft/leather supply stores. Purchase a heavier cording (if available) as thinner versions can snap with the tension required for tie-in and they can also cut into the leather. Others recommend "masonry twine" (braided nylon). Nylon has excellent elasticity and likes to shrink, keeping the tie-in tight.
An alternative for tie-in cord—this works out to be more expensive, but easily found—you can use waxed unflavored dental floss. (But don't get the floss made of Teflon.) Hammer a nail in the top of a fence (or some immobile wood object) and loop your dental floss over it, in one hand hold the loose end and with the other hold the dispenser. Walk backward about 50 feet (15m) then cut it from the dispenser. Tie the two loose ends together then double it up a second time, then a third, then a fourth so that you have about a 6 foot (2m) piece. Then twist it (keep the "looped end" on the nail) maybe 20 times then run your fingers over the length and—viola!—instant tie-in cord. Figure on two rolls of dental floss for one bag. Once you've done the tie-in and snipped off the excess cord, you can melt the ends with a lighter or matches to keep it from fraying.
Because it is waxed it will tend to slip tighter around the stock. Because the individual strands are thinner than other cord materials, it will form more of a solid mass of cord once the stock is tied-in.
More exotic alternatives can be found in heavy-duty plastic cable ties, telephone industry "12-cord," automobile hose clamps* (a metal collar tightened by a worm screw—such as Jubilee Clips) and an assortment of other twines, cabling, etc.
*Be careful with the hose clamps, overtightening and clamps with sharp edges can cause major problems.
|
Procedure
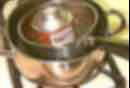
1) If you are replacing an existing bag, loosen the stocks by carefully cutting the tie-in cord with a seam ripper (a sewing item) or a sharp knife—avoid cutting too harshly with the knife, there's no need to gouge your stocks. Don't be too surprised if you find some skanky looking build-up on bottom of your stocks. Hopefully it won't be there, but it may be. This can be washed off with warm water and a little elbow grease—sometimes very gentle use of a blunt butter knife or toothbrush can be helpful if the deposits are stubborn. Some people even use bore oil to help remove bulid-up. I'd avoid using soaps or detergents, these may affect the natural oils found in the wood. If you wish to oil your stocks, this point would be a convenient time.
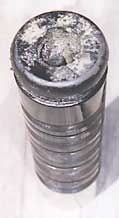 |
Yes, yours could look like this too—though we hope not! Expect to do at least a little cleaning of your stocks. |
2) Mark the new bag where the stocks will go.
You can use your old bag for reference, if you have one. (Keep in mind that if you were uncomfortable with the positions of any of the stocks in your old bag, now's the time to change their positions.) If you don't have a bag for reference, you can follow the following method for determining center points for the hole locations for an average size piper:
a) Middle (Tenor) Drone Stock: Laying the bag flat, fold the bag in half front to back and mark the top of your fold at the factory crease dividing the body side of the bag from the arm side of the bag.
b) Bass Drone Stock: Lay the bag flat, body side up. Measure 3 inches (76mm) straight down from the center point of the middle drone stock and then 3/4" to 1" (19mm to 25mm) toward the neck and mark it.
c) Outside Tenor Drone Stock: Lay the bag flat, arm side up. Measure 3 inches (76mm) straight down from the center point of the middle drone stock and then 1/2" to 3/4" (13mm to 19mm) away from the neck and mark it.
d) Blowpipe Stock: Lay the bag flat, body side up. Fold the bag front to back so the end of neck meets the center point for the Middle (Tenor) Stock and make a temporary mark at the fold. Unfold the bag and measure 1/2" to 3/4" (13mm to 19mm) straight down from the temporary mark and then mark the center point for your blowpipe stock.
Mark a small "X" to indicate your future openings, as dots may be hard to locate later.
|
Alternative for Determining Stock Positions
A method that you might strongly consider trying if you are a very large person or a very small person—or a combination of the two!—is the "temporary goose" method. (If you find the standard stock positions uncomfortable, this may be for you.) This method is known to have been demonstrated by Scott Walker, but my attempts to determine if he is the originator of this method have failed.
This requires two people.
1. Temporarily tie your blowpipe stock into the neck of the bag destined for the chanter stock. Insert your blowpipe.
2. Inflate the bag and position the bag so the blowpipe hangs in a comfortable chanter-playing position for your hands.
3. Have your assistant mark the bag with chalk, along your biceps and inner forearm, forming a rough "L" shape.
4. The middle tenor's position will be where the biceps chalk line crosses the top edge of the bag.
5. The blowpipe stock is typically placed midway between the middle tenor (chalk line) and the chanter end of the bag, though you may wish to adjust this. Your assistant can help get a bead on finding the correct angle and subsequently the correct stock position. Remember that there are different size mouth pieces out there, you don't have to use what came with your pipes.
6. At this point you can deflate your bag and untie your blowpipe.
7. The bass and outside tenor are positioned using normal measurements offset from the custom middle tenor position—though you may decide to move the outside tenor based on the forearm chalk line.
8. After clearly marking all your stock positions, proceed normally with the rest of the tie-in procedure.
|
3) Prepare your tie-in cord: Tie one end around one of your heavy dowels, loop the remainder all around the other dowel, leaving about 3 feet (1m) loose between the two. If you are using several short pieces of cording, you'll need to repeat this step before tying in each stock.
|
Alternate "Slip Loop" Method of Wrapping.
The images on this page show the traditional method of two dowels used to tighten the cording around the stock. Another method is the described here.
Take a length of cording. Tie it so that you create one long circle of cord. Create a slip knot and loop it over the stock. The opposite side/end of the cord place over a very secure hook. Pull very hard on the stock and bag away from the hook then start twisting around the stock stopping to pull the wrapping tight periodically. and loop it over the stock. The opposite side/end of the cord place over a very secure hook. Pull very hard on the stock and bag away from the hook then start twisting around the stock stopping to pull the wrapping tight periodically.
A way to get a really good grip on the stock is to insert a short dowel into the stock to get better leverage, you just have to grip the stock so it doesn't rotate around the dowel.
This method requires a special means of finishing off the wrapping. See "Finishing Off the Wrapping Around the Stock" below.
The downside of this method is having to turn the entire bag around and around repeatedly. This can get cumbersome when you are working on the last drone stock.
|
4) Feed a tenor stock* through the neck into the body of the bag. Use dish soap to ease sliding if it's a tight fit. (You'll want to clean any soap off as soon as possible.) Center the top end of the stock under its corresponding "X" on the bag.
*Some pipers prefer to start with the bass drone stock, which is fine too.
"Oops, I got my stocks mixed up!"
If you take your stocks out of your existing bag and forget which is which, it's easy to tell them apart by length. Here is list of the stocks from longest to shortest: bass, tenors, chanter, blowpipe. |
5) Cut your opening: Using a very sharp knife, cut from the center of the "X" to just shy of the interior edge of the opening in your stock. Be very careful not to nick your stock, particularly if it has ivory ferrules! See "Cutting the Opening" below.
I'll note here that depending on the animal from which the leather came from—such as cow, kangaroo, sheep—it'll be thicker or thinner, more or less flexible, and/or have other differences. Sheep can be thinner and easier to work with, for instance. If you're having a tough time of it, it may be the type of hide, not you. Just be patient. Once the process is done, it should last for years!
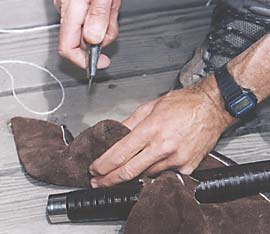 |
"X marks the spot."
Here we're just about to slice into the bag.
|
|
Cutting the Opening
Most pipers like to use a star shaped opening, that is, eight cuts from the center to form the opening. As everything, there's advantages and disadvantages. This method results in an opening that will allow the stock to pass through a little more easily. The images show an "X" shaped opening, a little quicker to execute than the star shape, but much less common since it's a bit more prone to tearing unless you are very experienced with it. (I prefer eight cuts or circular myself.)
A sure-fire way to avoid nicking your stocks with a blade is to indicate your opening by pressing the ferrule end of the stock very hard down onto the outside of the bag in its intended location, then use a wide wooden stick inserted into the bag and under the opening as a cutting surface (to prevent cutting the opposite side of the bag).
An alternative is a circular opening. A U.S. 25-cent coin can serve as a cutting template. Or some pipers who do a lot of bags, purchase a copper T-joint pipe—about a 1 inch (25mm) diameter—from a hardware store, then file down the edge of the bottom of the "T" to make it sharp enough to cut the hide. It can then be twisted it into the bag at the appropriate spot, using a wide wooden stick inside the bag under the opening to prevent cutting through both sides of the bag. Make sure your circle is centered correctly. The upside of this method is there's no chance of nicking your stocks with a blade and there are no weak spots that are more likely to tear. The downside is that you don't have the "spikes" of the star method to use as "handles" to pull the bag into position around the stock and there's always the chance of poking a hole all the way through your bag if your cutting surface inside the bag is in the wrong position.
|
6) Trim the opening as necessary. Try and slip the stock up part-way through the hole. It should be a tight fit and require a fair amount of force. If it's just not going, use your knife or sharp scissors to expand the opening. Trim as little as you think will make a difference. Remember that you can always trim more, but you can't put it back!
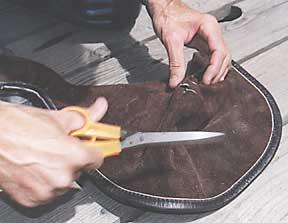 |
Trimming the cuts to allow the top of the stock to pass through.
|
7) Position the stock in the hole for tie-in. (Some pipers wet the leather to help it stretch. It will shrink later and make for a tight fit.) It's a good idea to start with about 1/2" (13mm), since after you are done there should be at least a 1/4" (7mm) of material above the groove in the stock.
 |
Here's the middle tenor drone in position and ready for tie-in. |
|
Holding the stocks in place temporarily
Some pipers experience problems with their stocks slipping while they tie them in and to rectify the problem use a hose clamp (a notched collar that tightens when a worm-screw is turned) to temporarily secure the stock in place. Once the stock is tied in, the hose clamp is unscrewed and removed.
|
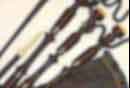
8) Tie-in the stock: Secure one of your two dowels under your feet, with the cording coming up between. Wrap the cording once around the stock, creating a half-hitch knot—a half-hitch is the very first step of tying your shoe after pulling the laces tight—then pull it tight making sure the cording stays in the provided groove in the stock. Three such loops around with the cording, pulling tight each time will sufficiently hold the stock in place, though some pipers use more. Secure the loose end of your cord. (See "Finishing Off the Wrapping Around the Stock" below.)
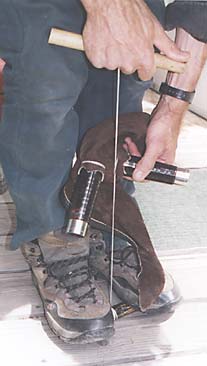 |
Pull that sucker tight! Notice the crossover of the cord creating a knot. |
|
Tying In
Instead of the second dowel, some pipers like to use a door knob or a strong hook as a fixed point from which to pull the cording tight around the stock. However you do it, keep your back straight and use good posture, especially if you are doing more than one bag at a time.
|
|
Finishing Off the Wrapping Around the Stock
There's some debate about the best method of securing the cord once you've finished wrapping it around the stock. Here's a few methods:
- After looping securely around the stock a few times, lay a "U" shape of a separate length of cord perpendicularly across the wrapping so it protrudes either side. Finish off all your wraps. Place the end of the main cord through the closed end of the "U". While keeping tension on it, cut off the excess, then pull on the two loose legs of the "U" (or tie the loose legs together for a better grip for use with a dowel) thereby pulling the end of the main cord underneath the body of the wrapping, to be hidden and held. This method is used with the "slip loop" method of wrapping.
- Once done wrapping, simply tie a few half-hitch knots—the simple knot you make when tying your shoe prior to making any loops—and be done. (If the cording is synthetic, some people use a flame to melt the knot into a permanent mass of material.)
- Once done wrapping, tie a clove hitch knot and if you want to be extra careful, finish it with a couple of half-hitches. (Again, if the cording is synthetic, some people use a flame to melt the knot together.)
|
9) Check the success of the tie-in by very aggressively trying to turn the stock loose. If it rotates at all, it needs to be redone. Make sure that there is intact leather visible above the tie-in cord around the entire stock, if not, it will probably not be airtight and should be redone.
10) Repeat steps 4 through 8 for the second tenor stock.
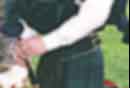
11) For your bass stock, do the same as for the tenors, but make sure the stock is leaning back and toward what will be the player's shoulder.
12) The blowpipe stock can sometimes be the trickiest part of the show. Ideally, it should be tied in a position that will minimize the likelihood of the blowstick swinging away from your mouth should it slip out of your mouth while playing. This means you are going to have a lot more material on the side of the stock closest to your mouth than the opposite side. Do a very preliminary tying of the stock, insert your blowpipe, plug the drone stocks and then inflate the bag and see how the blowpipe acts in relation to your mouth. Depending on your physiology and how you hold your bag it may not be possible to tie the stock such that the blowpipe just sits in your open mouth when the bag is full, but get as close as you possibly can to that goal.
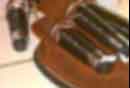
13) Chanter stock. Two loose pieces of rolled leather are needed on either side of the neck seam to create an airtight seal for the chanter stock. Sometimes this leather comes with the bag, other times you can just cut sections from an old bag, or simply reuse wads from the previous tie-in.
Create a noose out of hemp (dental floss or thread or orthodonic elastics will also work) to hold the two leather pieces in place. (You may also wish to secure the rolls themselves so they stay rolled.) You will probably need more material on the side of the stock facing your body so that the chanter will hang down and perhaps slightly back toward you. You may wish to check the position of your stock with the chanter in place and bag inflated prior to completing tahe tie-in. Many pipers do a second wrapping off-angle from the stock's channel to provide additional support for this twisted and pulled stock.
The chanter stock is often the most tricky to get airtight. Some pipers always slip a 2" (5cm) piece of cut bicycle tire inner tube (from a mountain bike or cruiser) over the groove of the chanter stock before tying it in. Others wrap various tapes over the groove. Some stuff the groove with kneaded eraser material or putty used to hold posters to walls. If your chanter stock leaks despite your best efforts, you might opt for one of these methods.
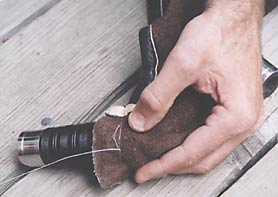 |
Here's the two leather pieces being held in place with some dental floss. |
After the Tie-In. Once your bag has been completely tied-in, you'll likely need to season your bag—if it's sheepskin, it definitely needed to be seasoned. Visit my Seasoning a Bagpipe Bag page for instructions.
Epilogue. Lay your old bag to rest. Or keep it and play a joke on your friends: "I was driving through 'Area 51'—you know, where UFOs are spotted—and well, this light appeared and I lost two hours of time, but when I regained consciousness, this exoskeleton was in my passenger seat..."
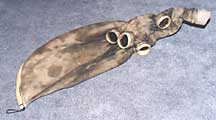 |
An old friend ready for final repose, rigor mortis has set in. |
Other resources
In 2007, Keith Bowes created an instruction sheet called Tie in Process of Sheepskin Bag (PDF), which may be helpful to you as well.
A Guide to Tying Knots This may be helpful for stock tie-in.
If you have comments or suggestions regarding this page, please contact me.
This page last updated Sunday, December 27, 2015.
Page first created in May 12, 2002.
|
|